The allure of a perfectly poached egg—with its delicate, set white and a rich, golden yolk that effortlessly oozes—is undeniable. It’s a culinary delight that elevates any breakfast or brunch, yet the traditional method of poaching can often feel daunting, leading to messy, inconsistent results. What if we told you there’s a simpler, more reliable way to achieve this breakfast perfection, consistently delivering those coveted runny yolks? Enter the electric egg cooker, a kitchen hero designed to take the guesswork out of egg preparation, especially when it comes to poaching. This guide will transform your egg-poaching experience, making those dreamy runny yolks an effortless reality right on your countertop.
What is an Electric Egg Cooker and Why Use It for Poaching?
An electric egg cooker is a compact kitchen appliance that utilizes steam to cook eggs to various consistencies, from soft-boiled to hard-boiled, and yes, even perfectly poached. Unlike the traditional stovetop method that demands precise temperature control, a swirl of water, and often a splash of vinegar, an electric egg cooker streamlines the process significantly.
The primary advantage for poaching lies in its consistent, steam-based cooking environment. This controlled heat ensures that your egg whites set gently while allowing the yolks to remain beautifully soft and runny. You avoid the common pitfalls of traditional poaching, such as egg whites scattering into the water or overcooking the yolk. Most electric egg cookers come equipped with a dedicated poaching tray, making them incredibly versatile and a true asset for anyone who loves eggs but seeks a less fuss-prone cooking experience. It’s a mess-free, set-it-and-forget-it approach that guarantees delicious results every time.
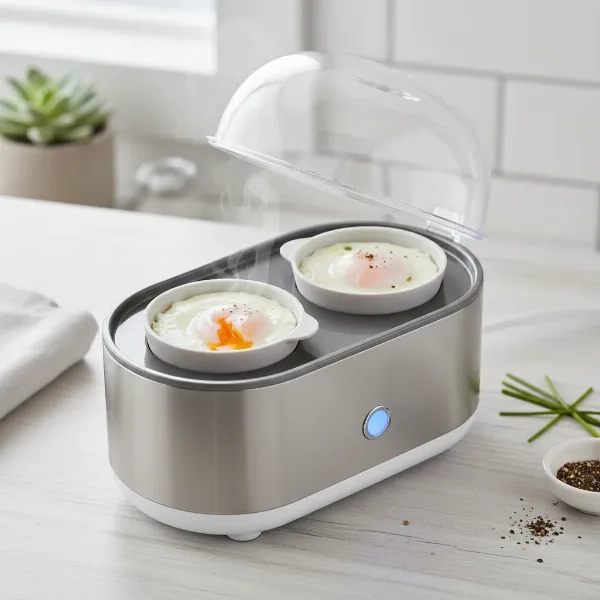 Compact electric egg cooker with clear lid showing perfectly poached eggs in non-stick cups
Understanding Your Electric Egg Cooker for Poaching
To achieve consistently runny poached eggs, it’s essential to understand the basic components and principles of your electric egg cooker. This knowledge empowers you to adapt and perfect the poaching process for your specific appliance.
Key Components for Poaching
An electric egg cooker typically consists of a few crucial parts that work in harmony:
- Water Reservoir/Heating Plate: This is the base where you add water. The heating element beneath it generates the steam needed for cooking.
- Egg Tray: Often a rack designed for boiling multiple eggs. While not used for direct poaching, it typically serves as a support for the poaching tray.
- Poaching Tray/Cups: This is the star for poached eggs. It’s a non-stick tray with individual indentations where you crack your eggs. Always ensure this tray is placed above the main egg tray, not directly on the heating plate, unless your manual specifies otherwise.
- Lid: A transparent lid traps the steam, ensuring even cooking and allowing you to monitor the process (though it’s usually best to keep it closed).
- Measuring Cup: Most cookers include a measuring cup with markings that indicate the amount of water needed for different levels of doneness (e.g., soft, medium, hard). This is your secret weapon for runny yolks.
|
Our Picks for the Best Egg cooker in 2026
As an Amazon Associate I earn from qualifying purchases.
|
||
| Num | Product | Action |
|---|---|---|
| 1 | Evoloop Rapid Egg Cooker Electric 6 Eggs Capacity, Soft, Medium, Hard Boiled, Poacher, Omelet Maker Egg Poacher With Auto Shut-Off, BPA Free |

|
| 2 | Elite Gourmet EGC-007## Rapid Egg Cooker, 7 Easy-To-Peel, Hard, Medium, Soft Boiled Eggs, Poacher, Omelet Maker, Auto Shut-Off, Alarm, 16-Recipe Booklet, White |
|
| 3 | Elite Gourmet EGC322CBL Easy Egg Cooker Electric 7-Egg Capacity, Soft, Medium, Hard-Boiled Egg Cooker with Auto Shut-Off, Measuring Cup Included, BPA Free, Classic Blue |
|
| 4 | Elite Gourmet EGC115M Easy Egg Cooker Electric 7-Egg Capacity, Soft, Medium, Hard-Boiled Egg Cooker with Auto Shut-Off, Measuring Cup Included, BPA Free, Retro Mint |
|
| 5 | Dash Rapid Egg Cooker - Boiler, Poacher & Steamer - Includes Measuring & Recipe Guide - Dishwasher Safe - Holds 7 Eggs, Aqua |
|
| 6 | Mojoco Rapid Egg Cooker - Mini Egg Cooker for Steamed, Hard Boiled, Soft Boiled Eggs and Onsen Tamago - Electric Egg Boiler for Home Kitchen, Dorm Use - Smart Egg Maker with Auto Shut OFF and Alarm |
|
| 7 | Rapid Egg Cooker, 12 Egg Capacity Electric Egg Cooker for Hard Boiled Eggs, Soft, Medium, Poached Eggs, Food & Vegetable Steamer for Breakfast, One-Touch Button, Over-Heat Protect, BPA-Free |
|
| 8 | DASH Electric Rapid Egg Cooker for Hard Boiled/Poached/Scrambled Eggs or Omelets with Auto Shut-Off Feature, Black, 7 Egg Capacity |
|
| 9 | DASH Rapid Egg Cooker: 7 Egg Capacity Electric Egg Cooker for Hard Boiled Eggs, Poached Eggs, Scrambled Eggs, or Omelets. |
|
| 10 | Elite Gourmet EGC115B Easy Egg Cooker Electric 7-Egg Capacity, Soft, Medium, Hard-Boiled Egg Cooker with Auto Shut-Off, Measuring Cup Included, BPA Free, Classic Black |
|
Water Levels and Doneness: Your Guide to Runny Yolks
The amount of water you add to the heating plate is the single most critical factor in determining the doneness of your poached eggs, especially when aiming for a runny yolk. Less water means shorter steaming time, resulting in softer, runnier eggs.
While your cooker’s manual will provide specific guidelines, the general principle is to use the water level recommended for “soft” or “medium” boiled eggs. For truly runny yolks with firm whites, you’ll likely use the lower end of your cooker’s recommended water measurements for soft-cooked eggs. Don’t be afraid to experiment slightly with the water level provided in your measuring cup until you find the exact amount that delivers your perfect runny yolk. This small adjustment is the key to customizing your poaching experience.
Step-by-Step Guide: Poaching Runny Yolks in Your Electric Egg Cooker
Crafting exquisite runny poached eggs in your electric cooker is a straightforward process when you follow these steps. The consistency of this method will quickly make it your favorite way to enjoy this classic dish.
Preparation is Key
Before you begin, a little preparation goes a long way in ensuring smooth, non-stick results and that picture-perfect poached shape:
- Gather Your Essentials: Have your electric egg cooker, fresh large eggs, and the measuring cup ready.
- Grease the Poaching Cups: This step is crucial. Lightly grease each individual poaching cup with butter, cooking oil, or a non-stick cooking spray. This prevents the delicate cooked egg from sticking and makes for easy removal.
- Choose Fresh Eggs: For the best poached eggs, always opt for the freshest eggs you can find. Fresh eggs have tighter whites that hold their shape better during cooking, leading to a cleaner, more appealing poached egg.
The Poaching Process
Once prepared, the actual poaching is simple:
- Add Water: Pour the recommended amount of cold water into the heating plate of your electric egg cooker. For runny yolks, aim for the “soft” or “medium” water line on your measuring cup. If your cooker doesn’t have specific poached egg markings, start with the soft-boiled egg measurement as a baseline.
- Assemble the Cooker: Place the main egg tray (if applicable) onto the base, followed by the greased poaching tray on top.
- Crack the Eggs: Gently crack one egg into each greased poaching cup. Be careful not to break the yolks.
- Cover and Cook: Securely place the lid on the cooker. Turn the appliance on. The cooker will begin to steam the eggs.
Achieving That Perfect Runny Yolk
Most electric egg cookers are designed to cook until all the water has evaporated, at which point they will automatically shut off or signal completion. The magic for runny yolks happens through the precise amount of water you add.
- Monitor (but don’t open the lid): Resist the urge to lift the lid during cooking, as this releases steam and can disrupt the cooking process. Trust your cooker.
- Timing for Runny: While cookers vary, the general window for a firm white and runny yolk in a steam-based cooker is often around 5-8 minutes, depending on the water amount and specific model. The key is that the cooker will stop when the water is gone.
- Immediate Removal: The moment your egg cooker signals that the eggs are done (typically by beeping or the indicator light turning off), immediately remove the poaching tray. Leaving the eggs in the warm cooker, even for a minute or two, can lead to residual cooking and a less runny yolk.
- Serve: Carefully slide the poached eggs out of the cups using a small spatula or spoon and serve them immediately.
With an electric egg cooker, achieving that coveted runny yolk becomes less about timing a traditional boil and more about calibrating the initial water measurement.
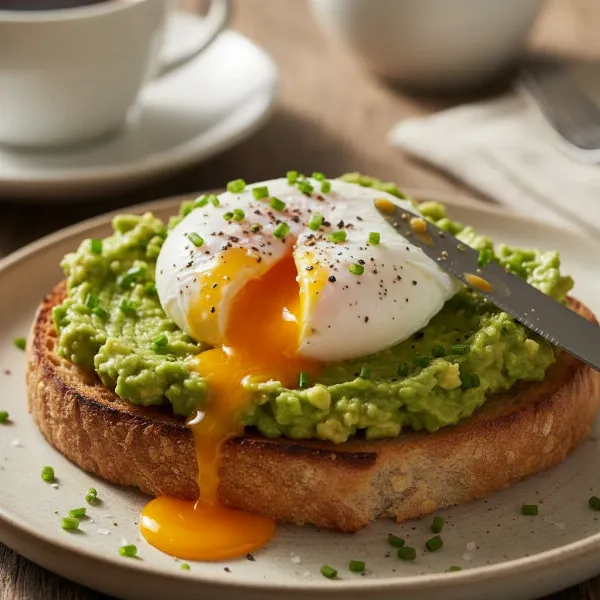 Close-up of a perfectly poached egg on avocado toast with a bright runny yolk
Troubleshooting and Tips for Perfect Runny Poached Eggs
Even with the ease of an electric egg cooker, a few common issues can arise. Knowing how to troubleshoot them will help you consistently achieve your ideal runny poached eggs.
Dealing with Sticky Eggs
One of the most frustrating experiences is when a perfectly cooked poached egg sticks stubbornly to the poaching cup.
- Always Grease: Reiterate the importance of thoroughly greasing your poaching cups. Butter, cooking spray, or a light brushing of oil creates a barrier that prevents sticking. Don’t skip this step!
- Careful Removal: Use a small, thin silicone spatula or a spoon to gently loosen the edges of the egg before lifting it out. Avoid sharp metal utensils that could scratch the non-stick coating.
Adjusting for Doneness
The beauty of the electric egg cooker is its repeatability, allowing you to fine-tune your results over time.
- Yolk Too Firm? If your yolks are consistently firmer than desired, it means too much water was added initially. For your next batch, reduce the water slightly using your measuring cup. Even a millimeter or two can make a difference.
- Whites Not Set (Yolk too runny, whites watery)? If the whites are still too transparent or the egg feels too delicate, you likely used too little water. Increase the water measurement slightly for your next attempt.
- Experimentation is Key: Every electric egg cooker model can behave slightly differently, and even egg size can play a role. Don’t be afraid to make small adjustments to the water level until you discover the sweet spot for your specific cooker and preference. Note down your successful water measurements!
Cleaning and Maintenance
Proper care ensures your electric egg cooker remains in top working condition for countless perfect poached eggs.
- Unplug and Cool: Always unplug the appliance and allow it to cool completely before cleaning.
- Wipe the Heating Plate: For the base unit with the heating plate, wipe it with a damp cloth. If mineral deposits (from water) build up, use a cloth moistened with white vinegar to gently scrub them away. This also helps sanitize the surface.
- Wash Trays and Lid: The poaching tray, egg tray, and lid can be washed in warm, soapy water. Most are top-rack dishwasher safe, but always check your manual. Ensure all parts are completely dry before reassembling or storing.
Buying an Electric Egg Cooker for Poaching
If you’re in the market for an electric egg cooker primarily for poaching, consider these factors:
- Dedicated Poaching Tray: Ensure the model comes with a non-stick poaching tray or cups. Some cookers are designed only for boiling.
- Capacity: How many poached eggs do you typically need? Cookers come in various sizes, from single-egg models to those that can poach up to six or seven eggs simultaneously.
- Features: Look for automatic shut-off and audible alerts. Some advanced models might offer more precise water measurement guides or even digital timers, though the basic steam models are often excellent for poaching.
- Brand Reputation: Choosing a reputable brand known for kitchen appliances can offer peace of mind regarding quality and durability.
Conclusion
With your electric egg cooker, the days of complicated, hit-or-miss poached eggs are over. You now possess the knowledge and the tools to consistently create those desirable runny yolks with firm, delicate whites that elevate any meal. The secret truly lies in understanding your appliance, particularly the precise water measurement for your desired doneness, and promptly removing the eggs once cooked. Embrace the simplicity and consistency your electric egg cooker offers, and embark on a delicious journey of perfectly poached eggs. Experiment with confidence, and soon you’ll be enjoying breakfast perfection with minimal effort. What culinary creation will you top with a perfectly runny poached egg next?